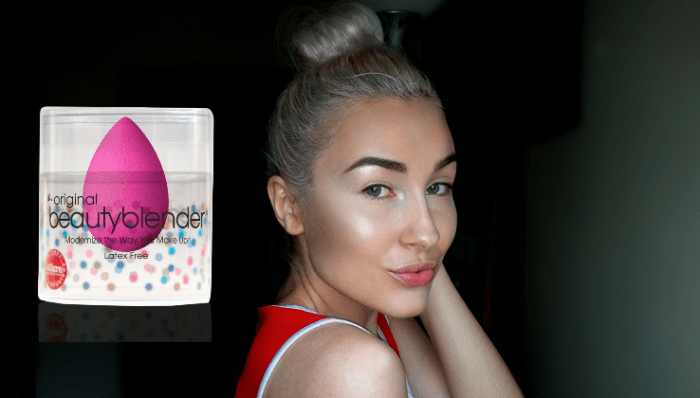
We’re half way through 2016 and I have NEVER tried Beauty Blender before 🙂 #BeautyBlogger
$20.00
Simply because I did not believe in it! The idea of using twice as much (or even more) product was not very appealing, since sponges typically soak up liquids (i.e. foundation, concealer, liquid highlighters etc.)
Soooo, after trying it today for the first time, here’s my review / impressions:
Does it make you use more product by soaking it up? – Yes! But, not us much as I thought it would!
Does it help to make your foundation / concealer /bronzer etc. application faster? – No! (At least I was bouncing for quite a while 😀 )
But why is everyone so obsessed with it?! And I will tell you why right after the first application! -THE FINISH!
Yes, the finish that it gives you will never be able to achieve with any brush, i.e. flawless but at the same time utterly natural look without any cakiness! And I am OK with using a little bit more product than usual, since that’s the whole purpose of it – to give you the desired coverage and beautiful finish that you’re happy with, otherwise why would you keep a foundation, for instance, if you’re not happy with the finish it gives, right?
Here, with the Beauty Blender I applied my Foundation, Concealer, did some baking with loose setting powder, Highlighter and a little bit of Bronzer.
There you have it! If you are just like me and have never tried it before – you should! It will change your makeup game & don’t forget to wet it before using, of course (#DUH!) 🙂
I hope this Blog Post was Helpful ♥
Please FOLLOW to get notified about my future posts!
We’re going to have a serious ‘Hair Talk’ today! 🙂
Let me start out by saying that I love my hair a lot & I try to take the best care of it possible! In my personal case, I have bleached, dry and damaged hair which really requires a lot of attention and good hair care products!
It was quite a mission for me to find something that really does work and that is affordable as well, meaning I could stick to it, call it my ‘holy grail’ and use it religiously. Because I’m sure we have all been there when we got a chance to try out something very expensive, that probably did work, but there’s no way we were ready to buy it monthly…you know what I mean?!
That being said, I am really excited to talk about MARC ANTHONY Hair Care – Coconut Oil (& Shea Butter) Line! This line includes 5 products and designed specifically for dry damaged hair:
Finding the right shampoo is the very first step towards healthier and beautiful hair! This Shampoo does an amazing job thoroughly cleaning your hair from all the dirt and unnecessary grease allowing the ingredients to get to the very roots of the hair and fill it with hydration and coconut oil giving it protection.
A little goes a very long way, it is quite effective in terms of lasting you a very long time and leaving your hair fresh!
And I have to mention the scent that it gives your hair ♥ If you are a coconut scent junkie like me, you are going to LOVE it!
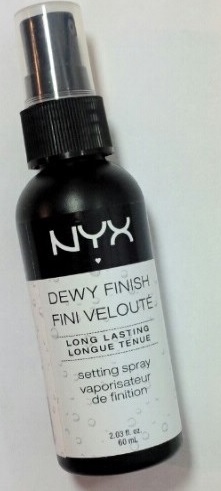
Today we are going to be reviewing the NYX Dewy Finish Setting Spray.
In the sea of over hyped & primarily high end setting sprays and finishing mists, it is hard not to be excited about affordable dupes #YAY!!! Drugstore has been seriously stepping it up! More and more drugstore brands are coming out with affordable alternatives. The question is, if the ‘alternatives’ are really such?!
NYX is one of my favorite drugstore brands, so I decided to give a go to its new setting spray.
The one I got for myself is the ‘dewy finish’ one which is perfect for winter since my skin does tend to get dry. However, there’s also a ‘matte’ one, if that’s the type of finish you desire ♥
PROs:
PRICE! The first advantage of this product is that it is quite affordable (I got mine at CVS for $9.00), especially in comparison with high end ones (over $30.00 on average). You get 2.03 fl. oz / 60 ml, which is not a crazy big amount but considering that, for instance, I personally think that settings sprays is something for a special occasion in order to make your makeup last longer than usual (and that’s how I plan to use it) – the amount of the product is quite decent!
FINISH! NYX Setting Spray gives an absolutely beautiful dewy finish that lasts all throughout the day. This is definitely one of the main reasons I fell in love with this product! Nothing has ever made my skin that glowy and healthy looking 🙂
LONGEVITY! The spray lasts literally all day, there’s no need to reapply it. Which also means that you’re using a very little amount of product at once (thanks to its awesome delivery system, btw) and it will last you a very long time!
CONs:
SCENT! It literally smells like a subtle version of hair spray, which is not the best scent, especially when you spray it on your face. To be fair, the smell does go away in a very little while, so I personally can handle that!
SMASHBOX Iconic Photo Finish Foundation Primer
(Helps makeup to last all night long, fills in the pores & smooths out skin texture)
L’OREAL True Match Foundation in W4 (Gives a flawless finish, evens out skin tone, full coverage foundation without cakiness, looks great in photos – no white cast!)
L’OREAL True Match Concealer in 2 Vanilla (Cancels out dark circles under the eyes, full coverage with just a tiny bit of product, does not crease)
ISADORA Loose Powder in 01 Velvet Transparent (Sets concealer and adds some brightening effect in the undereye area)
SEPHORA Pressed Powder in 25 Beige (Sets foundation, adds a beautiful flawless matte finish)
BENEFIT Hoola Bronzer (Perfect Shade for contouring for all skin shades, its matte finish makes it look super natural)
ELF Blush Palette in Dark / Top Right Shade (Beautiful bright lilac pink long lasting blush for a very affordable price)
CATRICE Lumination Eyeshadow in Radiant Rose (Beautiful affordable alternative to many high end products in this range! Goes great as all over the lid & inner corner color, as well as highlighter -gives beautiful pink based glow)
CATRICE Brow Stylist in 020 (Perfect shade for blondes, gives a very natural look to your eyebrows by slightly filling in the sparse areas and carving out the arch)
COVERGIRL Eyeshadow Quad in Coffee Shop / White Shade (Served as a matte base for eyeshadow)
MAC NC6 Eyeshadow Palette / Burgundy (Beautiful transition shade in the crease, has silver specs for an extra festive look) | Silver Ash (Slightly shimmery gray shade in the outer V for some definition)
L’OREAL Infallible Eyeshadow in 003 (One of the most beautiful champagne all-over-the-lid shades I have ever seen! Highly pigmented and very long lasting)
MARY KAY Eyeliner Pen in Black (Used along the lash line to create the illusion of thicker lashes, looks very subtle and natural)
FLORMAR Glittering Star Eyeliner in Green (Subtly pigmented green eyeliner with golden shimmer, looks absolutely gorgeous along the lower lash line, complementing the eye color and making the look stand out)
L’OREAL Eyeliner in 120 Immaculate Snow (Perfect liner for your waterline, very soft and highly pigmented & long lasting)
ESSENCE I Love Extreme Crazy Volume Mascara (My current favorite mascara, give thick, long, full eyelashes effortlessly)
CATRICE Lipstick in 310 Red My Lips (Classic Blue based red lipstick, makes your teeth look extra white, helping you “shine” all night long – my current favorite red lipstick!)
Here’s a super fast tutorial that will make your life a million times easier)
If you have ever struggled with winged eyeliner application, it will change into better once you follow these simple 3 steps:
~~~
1. Slightly pull the outer corner of your eye towards the ear, draw a line all the way from the inner corner of your eye to the outer corner. Try your best to do it in one stroke, that’s how the line is going to be crisp and stunning looking!
2. Draw a stroke of a size as long as you want your wing to be, from the outer corner of your eye towards the tail of the eyebrow.
~~~
3. From the end of the wing draw a stroke inwards connecting it with the original one, and… there you have it!
In this blog post I’m going to be talking about the products that I’ve tested for years & that have proved themselves to be literally TOPs in my list of Hair Care Products.
However, we’re going to be talking about “after shower” care, i.e. excluding shampoos, conditioners etc. (gonna touch it upon in the future posts)
5.2 FL. OZ (154 ml) $6
1. Referring to the particular order of hair care procedure that I’ve developed for myself, would like to start with a moistureenrichment product: Right after washing my hair, I apply AVEENO NOURISH + CONDITION Leave-In Treatment. It “locks” the moisture in hair, making it soft and healthy, while treating spit ends as well! It also has a very pleasant scent, which is a great plus for me ❤
~~~~~
8 FL. OZ (237 ml) $4
2. I am sure, all of us this way or another apply heat to our hair! Well, I do it a LOT! It has always been extremely crucial for me to use heat protectingproducts and apply them every time before I blow dry, straighten or curl my hair! I’ve been raving about TRESemme Thermal Creations Heat Tamer Protective Spray in my beauty / recommendation videos for quite a while! I have not found a better product ever since, it completely “blocks” the heat influence, leaving hair looking and feeling healthy.
~~~~~
6.8 FL. OZ (200 ml) $45
3. You can never go wrong with a really really good (don’t be afraid to invest – it’s really worth it!) Oilwhen it comes to hair treatment. It’s perfect for the split ends (I suggest avoiding the roots!), adds shine and healthy look. As for the dry hair – it is absolutely necessary! The one I’ve been using for years is MoroccanOil Treatment. I use it after the shower on wet hair rubbing it into my hair, when my hair is dry on a daily basis to add some additional shine, sleek it out when wearing a pony tail etc.
Now, whenever there is a word “review” in the title of my blogpost, it usually means I’ve discovered something outstanding that is worth sharing with you ♥
Let’s talk about CC Creams in general: CC stands for Color Correction, this makeup item is basically entitled to even out skin tone and give sort of a veil effect by adding a minimum of coverage to one’s face while still making it look nearly flawless!
One of the greatest advantages as opposed to full coverage foundations is that CC Creams are usually significantly lighter (not heavy on the skin, letting it breathe) & wearing them is more convenient, especially for beginners who are not feeling comfortable when there’s something on the face 🙂
I have noticed myself reaching out for my EVELINE CC CREAM way much more often than for my foundation for the recent time! Simply because I am hands down satisfied by the way it’s working:
– Consistency: comes out white with tiny particles (resembling a scrub), while
blending it in, easily blends into the natural skin tone, evens it out giving a very subtle glow to it.
– Treatment: contains SPF 15, which makes it perfect for everyday use, especially when your face is exposed to the sun for a long period of time (clearly). A go-to must-have, since you reach a desired polished look for your face and protected, as well as treated, by moisturizing the skin.
– Price: EVELINE CC Cream is very affordable! I got mine for a little under 8 USD. Honestly, it is an awesome deal! Especially considering that, for example, such product as “Josie Maran Serum Foundation” costs 42 USD at Sephora! Whereas, it is clearly a ridiculously similar product (imho) to Eveline CC Cream (consistency, coverage, spf, even scent! etc.)


 That being said, I am really excited to talk about


 Hi, beautiful ♥


 pigmented green eyeliner with golden shimmer, looks absolutely gorgeous along the lower lash line, complementing the eye color and making the look stand out)
 If you have ever struggled with winged eyeliner application, it will change into better once you follow these simple 3 steps:
 2. Draw a stroke of a size as long as you want your wing to be, from the outer corner of your eye towards the tail of the eyebrow.


 (resembling a scrub), while
 – Price: